When KinglySlate is used with the recommended adhesive, it can be applied on: OSB, MDF, cement board, polystyrene board, drywall, composite boards, wood, metal, glass, ceramic tile, polycarbonate, steel frame, EIFS, stucco, aluminum, concrete, masonry, wood, stone, glass, vinyl, fiber cement siding, metals, PVC, Kynar 500 and many other substrates. KinglySlate is not recommended for flooring applications due to the thickness of the stone.
PREPARATION
Before the application, clean, brush and/or degrease all surfaces of dust or oils.
LAYOUT & PATTERNS
The preparation of the area to be covered and the layout of the KinglySlate sheets is the same as of conventional stone veneers or tiles. Time spent preparing the work area will pay off in a job well done. A preliminary dry fit template of the KinglySlate sheets allows pattern and orientation of individual sheets, textures, veins and colors before final placement. It is recommended to set dry fit each sheet exactly where it will be placed on. Numbering the sheets to track relocation before cutting and trimming will save time.
ADHESIVE
Soudaseal AP, is an all-purpose SMX® polymer sealant/adhesive. It can be used for both indoor and outdoor applications and remains perfectly flexible after cure (+/- 35%). Completely solvent and isocyanates free, it does not shrink, stays consistent in hot or cold temperatures. Coverage: 4 ft2 per cartridge.
ADHESION
1. PREPARATION: Surfaces must be free of any material that may prevent adhesion, including severe and thick amounts of drywall joint compound. Patch holes and depressions, and remove any bumps, high spots, dust, oil and grease. Cut and pre-fit all KinglySlate Sheets.
2. APPLICATION:
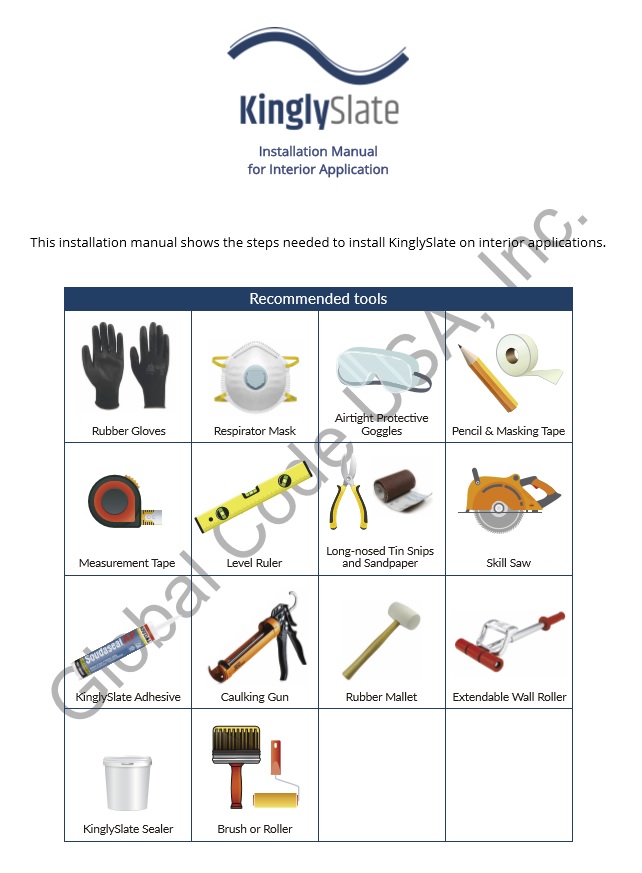
2.1. Cut the nozzle of the adhesive with a scalpel (recommended diameter: 1/4 inches).
2.2. Using a caulking gun, apply the adhesive around the perimeter of the sheet leaving an offset of ¾” width.
2.3. Apply the adhesive leaving spaces of approximately 1¼” between each adhesive strip. Spread no more adhesive than can be installed in 12 minutes or less.
2.4. Place the KinglySlate Sheet on the surface and press firmly from the center to the edges.
2.5. Roll over the entire surface with an extendable wall roller; make sure to apply pressure throughout the area. If you don’t have an extendable wall roller, you can also use a rubber mallet (16 oz.).
3. CLEANUP: It is important to cleanup adhesive once it has cured. The adhesive can be removed carefully with a scalpel. To clean adhesive from tools and hands while wet, use isopropyl alcohol or acetone as a solvent.
KINGLYSLATE CAN BE EITHER BUTT JOINTED OR GROUTED:
GROUTING: for best results, a test board is recommended to determine what size grout joint works best in your project (an 1/8” to 1/4” grout joint will produce best results. With grout joints this thin, premixed acrylic or sanded grout works best). Premixed grouts are available in several standard colors and easy to clean up with water. To make a grouting joint, space should be left between the sheets (if necessary, tile spacers can be used). The edges should be taped with masking tape. After taping, grout the joints with premixed acrylic or sanded grout. Afterwards, pull off the tape immediatly before the grout is dry. Let the grout or silicon harden. After the grout is dry, a second layer of sealer must be applied.
EDGE ON EDGE: on the case of jointless bonding, adhesive excess may leak out of the joint. In order to protect the sheet, the edges on the front should be covered with masking tape before applying the adhesive.
SEAL
After the grout dries, it is recommended to seal the KinglySlate Sheet. To protect the natural stone surface, apply the sealer with a sponge roller or a brush in a very thin layer crosswise. Let the material dry and then wipe off any excess of moisture to ensure no staining in the material surface.
CUTTING OR DRILLING
The material can be cut or drilled with standard wood working materials. Cutting straight lines and curves is better done using longnosed tin snips. When cutting large amounts of material, it is advisable to use diamond bladed tools or skill saw. KinglySlate should be cut from the backside for a clean finish.
CORNERS
To create 90° corners, first of all measure the dimensions of the area and cut the KinglySlate Sheet. To achieve a proper joint, slightly sand the corners of each piece leaving a 45° angle. Afterwards, add adhesive to both sheets and place them on the desired corner. Place some strips of masking tape to ensure tensile pressure. Once the adhesive has hardened pull off the masking tape.
SAFETY & PRECAUTIONS
Due to the fiberglass composition of the backing care must be taken when working with KinglySlate. Always use proper gloves, goggles and dust mask. Industry standards recommend a NIOSH/MSHA approved respirator for this type of material. When using a saw always be sure to take proper precautions to cover skin and eyes from fiberglass dust. If machine sanding, grinding or cutting KinglySlate, be sure to properly exhaust and/or vent equipment.
SILICA DUST AVOID BREATHING SILICA DUST
This product when cut, drilled or abraded produces dust containing free silica which may cause cancer or delayed lung injury (Silicosis) if inhaled. Work outdoors or in a well-ventilated area. Please wear safety glasses and dust mask. If in dusty areas or where airborne dust exceeds PEL, wear NIOSH/MSHA approved respirator
